
Connect Scannable to the systems you already use. An API key lets your ERP, PIM or production line software work with your Scannable data. The Scannable MCP lets an AI assistant do everyday jobs for you.
Create an API key
Only Admins can see and manage API keys. An API key acts for your organisation, not for the person who created it.
- Go to Settings and select the API keys tab.
- Select Create API key.
- Enter a Name, such as the system that will use the key. Add a Description if you like.
- Under Scopes, choose what the key can do. See the next section.
- Under Expiry, choose when the key stops working: Never, after 7, 30, 60 or 90 days, or a custom date.
- Select Create API key.
- Copy the key and store it somewhere safe. Scannable shows it only once.
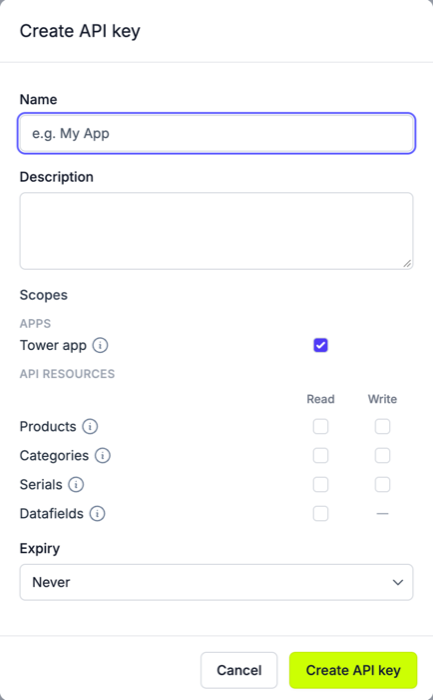
Scopes
A scope gives the key access to one part of your data. Choose at least one.
| Scope | Read | Write |
|---|---|---|
| Products | View products and their SKUs. | Create, change and delete products and SKUs, with their data-field values. |
| Categories | View categories and their data fields. | Not available yet. |
| Serials | View purchase orders, production runs, serials, printers and printing. | Create purchase orders, add and change serials, print. |
| Datafields | View data field definitions. | Not available. Data field definitions can't be changed by the API. |
Write does not include read. A system that creates purchase orders and then reads them back needs both.
Tower app, under Apps, lets the key sign in to the Scannable Production App. It is ticked by default and gives no API access on its own.
You can't change the scopes of an existing key. Create a new key with the scopes you need, switch your system to it, then revoke the old one.
See and revoke your keys
The API keys tab lists every key, with its scopes, the date it was created and when it expires. Select a key to see its details.
To revoke a key, open its menu and select Revoke. The key stops working straight away, and any system using it stops too. You can't undo this.
What the API covers
The Scannable API lets your own systems manage your products and SKUs, with their data fields and files. It also covers purchase orders, production runs, serials, serial formats, printers and label printing, so your systems can raise orders and print labels without anyone opening Scannable.
The developer docs explain how to use the API, with a quickstart, guides and a full reference. They are for manufacturers only and need a password. To get it, contact support@scannable.io.
The Integrations tab
Some organisations have an extra tab in Settings, called E-commerce / inventory management integrations. It appears when Scannable has set up Label Live printing for you. It holds your Label Live templates and your Printers.
Connect an AI assistant with the Scannable MCP
The Scannable MCP connects an AI assistant, such as Claude, to your Scannable account. You can then do everyday jobs by asking in plain words, using your own part numbers, PO numbers and printer names. For example:
- Find a product or SKU, or add a new one.
- Raise a purchase order, check its progress, or print its labels.
- Trace a serial, or add captured serials to a production run.
- Ask which specifications a category takes, and set certifications.
The assistant can only do what your role in Scannable allows. It asks for any details you leave out before it creates or prints anything.
How to connect
- In your AI assistant, add a custom connector (also called an MCP server) with this URL:
https://mcp.scannable.io/ - When asked, sign in with your Scannable account.
- If you belong to more than one organisation, choose the one to connect.
In Claude, for example, go to Settings › Connectors and select Add custom connector.
You don't need an API key for the MCP. You sign in as yourself, so the assistant works with your own permissions. To work in a different organisation, disconnect and connect again, then choose the other organisation.